Many people use Lorex cameras for security. They help keep homes and businesses safe. These cameras have a feature called night vision. Night vision lets you see in the dark. But sometimes, you might want to turn it off. This article will explain how to turn off night vision on Lorex cameras.
Why Turn Off Night Vision?
There are a few reasons to turn off night vision:
- To save power.
- To reduce glare.
- To avoid unwanted alerts.
- For better daytime viewing.
Understanding these reasons can help you decide when to turn off night vision.
Steps to Turn Off Night Vision
Turning off night vision on a Lorex camera is easy. Just follow these simple steps:
Step 1: Access Your Camera Settings
First, you need to access your camera settings. You can do this in two ways:
- Using the Lorex app on your phone.
- Using a computer connected to the camera.
Make sure you are connected to the same Wi-Fi network as your camera.
Step 2: Log In To Your Account
Next, log in to your account. Enter your username and password. If you forgot your password, you can reset it. Follow the prompts on the screen.
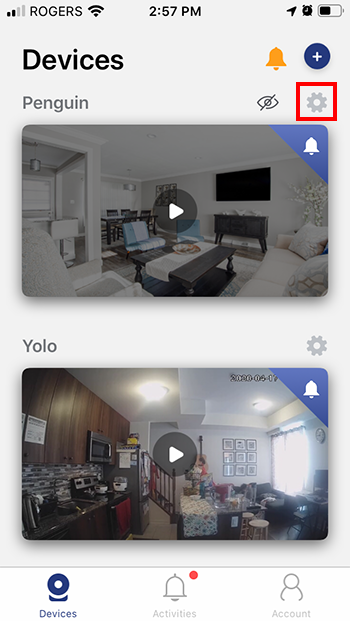
Step 3: Find The Camera You Want To Adjust
Once logged in, you will see a list of your cameras. Click on the camera you want to adjust. This will open its settings.
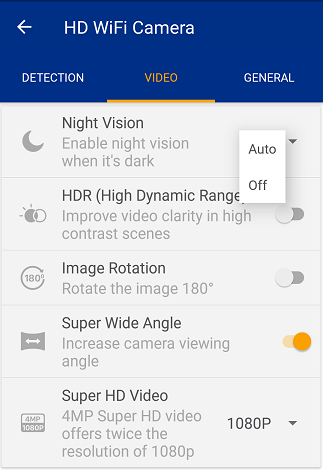
Step 4: Locate Night Vision Settings
Now, find the night vision settings. Look for a section labeled “Video” or “Display.” The night vision settings will be under this section.
Step 5: Turn Off Night Vision
In the night vision settings, you will see an option to turn it off. Click on the toggle switch to turn it off. Make sure to save your changes. Look for a “Save” button at the bottom of the page.
Step 6: Test Your Camera
After saving, test your camera. Check if night vision is off. You can do this by viewing the camera feed during the night. If you see colors instead of black and white, night vision is off.
Troubleshooting Common Issues
Sometimes, you may face issues while turning off night vision. Here are some common problems and solutions:
Problem 1: Unable To Access Settings
If you cannot access your camera settings, check your internet connection. Make sure your device is connected to the same network.
Problem 2: Night Vision Does Not Turn Off
If night vision does not turn off, try refreshing your camera feed. You can also log out and log back in. If this does not work, restart your camera.
Problem 3: Camera Feed Is Still Black And White
If the camera feed is still black and white, check if the camera is in a dark area. Night vision may activate automatically in low light.
When to Use Night Vision
Night vision is useful in some cases. Here are a few situations when you might want it on:
- When it is dark outside.
- When you want to monitor at night.
- When you need to see in low light.
Using night vision can help you keep an eye on your property.
Frequently Asked Questions
How Do I Disable Night Vision On Lorex Cameras?
To disable Night Vision, go to the camera settings in the app or software. Look for the Night Vision option and turn it off.
What Happens When I Turn Off Night Vision?
Turning off Night Vision stops the camera from switching to infrared mode. This means you won’t see video in low light.
Can I Turn Off Night Vision Remotely?
Yes, you can turn off Night Vision remotely using the Lorex app or software. Just access the settings from your device.
Why Would I Want To Turn Off Night Vision?
You may want to turn it off during the day or if you need normal color video. It helps avoid unwanted black-and-white images.
Conclusion
Turning off night vision on a Lorex camera is simple. You can do it using the app or a computer. Follow the steps provided in this article. Always check your camera settings to ensure they are correct. If you have any problems, try troubleshooting the issues mentioned.
Remember, you can always turn night vision back on when needed. Keeping your security settings updated is important. This ensures you have the best surveillance for your home or business.
Thank you for reading this guide. We hope it helps you manage your Lorex camera better. Stay safe and secure!