Setting up a Lorex camera system can feel tricky. But don’t worry! This guide makes it easy. Follow these steps to get your camera system ready. You will feel safe and happy with your new security system.
What You Need
Before starting, gather these items:
- Lorex camera system kit
- Power adapter
- Network cable (if needed)
- Screwdriver
- Drill (if mounting on the wall)
- Monitor or TV
Step 1: Choose the Right Location
Pick good spots for your cameras. Think about these things:
- What area do you want to watch?
- Is it well-lit?
- Can you see the camera from where you are?
Common places to install cameras include:
- Front door
- Backyard
- Garage
- Driveway
Step 2: Install the Cameras
Now it’s time to install your cameras. Follow these steps:
1. Prepare The Mounting Surface
If you plan to use screws, mark where to drill. Use a pencil for marking. Make sure the camera is straight.
2. Drill Holes
Use the drill to make holes. Be careful. Make sure the holes are deep enough for the screws.
3. Attach The Camera
Place the camera on the wall. Use screws to secure it in place. Make sure it is tight.
4. Connect The Cables
Connect the power cable to the camera. If using a wired system, connect the network cable too.
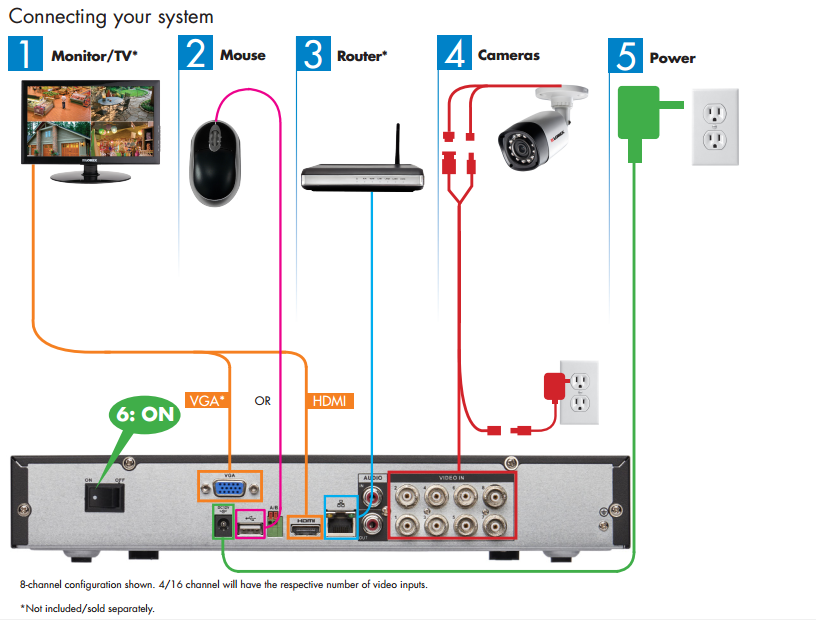
Step 3: Connect the DVR/NVR
The DVR (Digital Video Recorder) or NVR (Network Video Recorder) is the heart of your system. Here’s how to set it up:
1. Find A Good Spot
Place the DVR/NVR near a power outlet. Make sure it is also near your internet router if using network cables.
2. Connect To Power
Plug the power adapter into the DVR/NVR. Then, plug it into the wall.
3. Connect To The Monitor
Use an HDMI cable. Connect one end to the DVR/NVR. Connect the other end to your TV or monitor.
4. Connect To The Internet
If you want remote access, connect the DVR/NVR to your router. Use a network cable for this.
Step 4: Power On the System
Now, it’s time to power everything on:
- Turn on the monitor or TV.
- Press the power button on the DVR/NVR.
Wait a few minutes. The system will boot up. You will see the camera feed on the screen.
Step 5: Setup the System
Now, you need to set up your system. Follow these steps:
1. Follow On-screen Instructions
The first time you turn on the system, it will guide you. Follow the prompts on the screen.
2. Create A Password
Choose a strong password. This keeps your system safe. Write it down somewhere safe.
3. Adjust Settings
You can change settings. For example:
- Camera resolution
- Recording schedule
- Motion detection settings
Step 6: Test Your Cameras
After setup, test your cameras. Walk in front of each camera. Check if you can see yourself on the monitor.
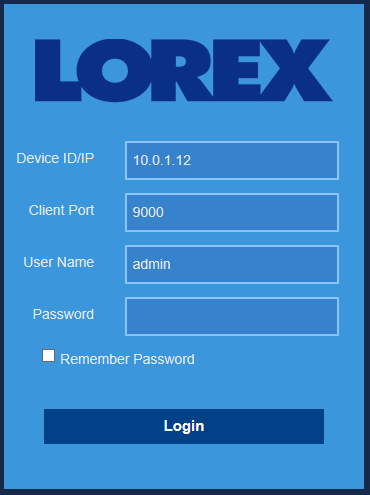
Step 7: Access Your Cameras Remotely
Many Lorex systems let you watch from your phone or tablet. Here’s how:
1. Download The App
Go to your app store. Search for the Lorex app. Download it.
2. Create An Account
Open the app. Create an account with your email.
3. Add Your System
Follow the app instructions. Enter the system’s ID and password. Your cameras will be added.
Step 8: Maintain Your System
To keep your system working well, do these things:
- Check camera angles monthly.
- Clean the camera lenses.
- Update the software when needed.
Common Issues and Solutions
Sometimes, you may face problems. Here are some common issues:
| Problem | Solution |
|---|---|
| No video feed | Check camera connections and power. |
| Can’t access remotely | Check your internet connection and settings. |
| Motion detection not working | Adjust the motion settings in the app. |
Frequently Asked Questions
How Do I Connect My Lorex Camera To Wi-fi?
To connect your Lorex camera to Wi-Fi, open the Lorex app, select your camera, and follow the on-screen instructions.
What Do I Need To Setup My Lorex Camera System?
You need a Lorex camera, a power source, and a smartphone or computer for setup.
Can I Access My Lorex Camera Remotely?
Yes, you can access your Lorex camera remotely using the Lorex app on your smartphone.
What Is The Best Way To Mount My Lorex Camera?
Mount your Lorex camera at eye level, away from direct sunlight, and ensure it covers the desired area.
Conclusion
Setting up your Lorex camera system is easy. Just follow these steps. Choose good locations for cameras. Connect everything properly. Test your cameras and enjoy the peace of mind. Always keep your system updated and maintained. Stay safe and secure with your Lorex system!