Installing a Lorex camera system is a simple task. It helps keep your home safe. This guide will help you step by step. We will cover everything you need to know. Follow these instructions for a successful installation.
What You Need
Before starting, gather all the necessary tools and materials. Here’s a list:
- Lorex camera system kit
- Power adapter
- Cables for the cameras
- Drill and drill bits
- Screwdriver
- Mounting brackets
- Monitor or TV
- Router for internet connection
Step 1: Choose Camera Locations
First, decide where to place your cameras. Look for areas with good visibility. Here are some tips:
- Place cameras near doors and windows.
- Cover driveways and garages.
- Check blind spots in your yard.
- Ensure cameras have power sources nearby.
Step 2: Prepare the Cameras
Next, unpack the cameras. Check for any damage. Make sure all parts are present. Then, attach the mounting brackets. This will hold the cameras in place.
Step 3: Drill Holes for Installation
Now it’s time to drill holes. Use your drill to make holes where you marked. Be careful and wear safety glasses. Make sure to drill at the right angle.
Step 4: Mount the Cameras
After drilling, it’s time to mount the cameras. Align the camera with the holes. Use screws to secure the mounting bracket. Make sure it is tight and stable.
Step 5: Connect the Cables
Once the cameras are mounted, connect the cables. Plug the power adapter into an outlet. Connect the camera cable to the power adapter. Make sure all connections are secure.
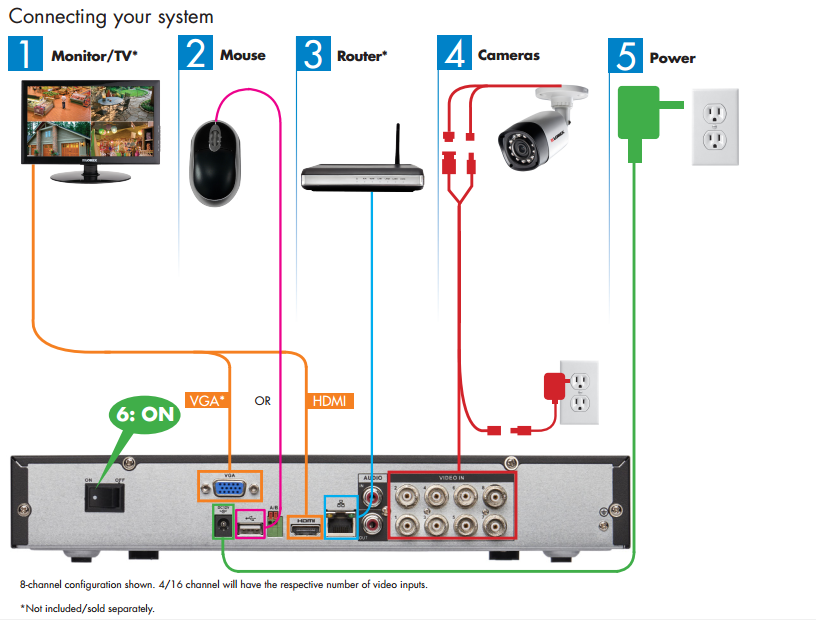
Step 6: Connect to the DVR/NVR
Your Lorex system comes with a DVR or NVR. This is the recording device. Connect the camera cables to the DVR/NVR. Follow these steps:
- Find the input ports on the device.
- Plug in the camera cables.
- Ensure all cables are connected properly.
Step 7: Set Up the Monitor
Next, set up the monitor or TV. Connect it to the DVR/NVR using an HDMI cable. Turn on the monitor. You should see the camera feeds. If not, check your connections.
Step 8: Configure the System
Now, configure your Lorex system. Use the remote or buttons on the DVR/NVR. Set the date and time. Adjust the camera settings as needed. You can change the brightness and contrast.
Step 9: Test the Cameras
After configuration, test each camera. Move in front of each camera. Check if the video is clear. Make adjustments to angles if necessary.
Step 10: Connect to the Internet
If your Lorex system supports internet connection, connect it now. Use an Ethernet cable. Plug it into your router. This allows remote viewing on your phone or computer.
Step 11: Download the Lorex App
To view your cameras remotely, download the Lorex app. It is available for iOS and Android. Follow these steps:
- Go to the App Store or Google Play.
- Search for “Lorex.”
- Download and install the app.
Step 12: Set Up the App
Open the Lorex app on your device. Create an account if you don’t have one. Follow the on-screen instructions. Add your camera system to the app.
Step 13: Adjust Settings on the App
Once connected, adjust settings in the app. You can set notifications for motion detection. Choose how you want to receive alerts. This keeps you informed about activity.
Step 14: Regular Maintenance
After installation, maintain your system. Clean the cameras regularly. Check cables for wear and tear. Ensure the DVR/NVR is working properly. Regular maintenance keeps your system effective.
Common Issues and Solutions
Sometimes, problems may arise. Here are some common issues and solutions:
| Issue | Solution |
|---|---|
| No video feed | Check camera connections and power supply. |
| Camera image is blurry | Adjust the camera angle and clean the lens. |
| Cannot connect to the internet | Check your Ethernet cable and router settings. |
| Motion alerts not working | Check alert settings in the app. |
Frequently Asked Questions
How Do I Connect My Lorex Camera To Wi-fi?
Connect your camera to Wi-Fi using the app. Follow the on-screen steps to set it up.
What Tools Do I Need For Installation?
You will need a drill, screws, and a screwdriver. Cable ties can also help with organization.
Can I Install Lorex Cameras Outdoors?
Yes, many Lorex cameras are designed for outdoor use. Ensure they are weatherproof.
How Do I Power My Lorex Camera?
Use the power adapter provided. Plug it into a nearby outlet.
Conclusion
Installing a Lorex camera system is straightforward. Follow these steps carefully. With the right tools and preparation, you can do it easily. Enjoy the peace of mind your cameras provide. Stay safe and secure with your new system.
Remember, regular maintenance is key. Keep an eye on your camera feeds. This ensures your home stays protected. Happy monitoring!