Keeping the time correct on your Lorex camera is important. A camera that shows the wrong time can confuse you. You may miss important events. In this guide, we will show you how to change the time on your Lorex camera. It is simple and easy. Just follow the steps below.
Why Change Time on Lorex Camera?
There are many reasons to change the time. Here are a few:
- You want accurate timestamps on your recordings.
- You moved to a new time zone.
- You need to fix a battery issue.
- You want to match the time with other devices.
Now, let’s learn how to change the time on your Lorex camera.
Step-by-Step Guide to Change Time
There are different types of Lorex cameras. The steps may vary a little. But most steps are similar. Here is a general guide:
Step 1: Connect Your Camera
First, make sure your camera is connected to power. If it is a wireless camera, check the Wi-Fi connection. If you have a DVR or NVR, connect it to your TV or monitor.
Step 2: Access The Camera Settings
You need to access the camera settings. Here is how:
- Use your remote or mouse.
- Go to the main menu.
- Select “Settings” or “Configuration.”
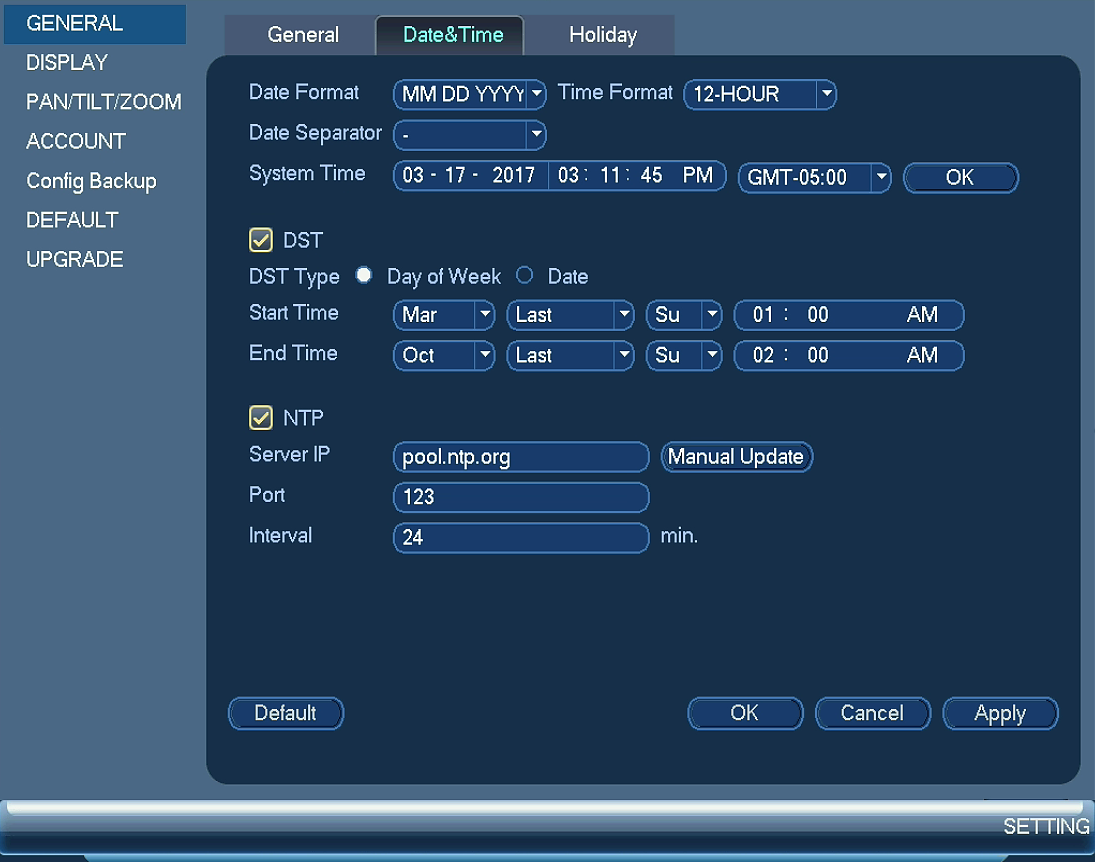
Step 3: Find The Date And Time Settings
Look for the date and time settings. It may be under “General Settings” or “System.” Click on it to open.
Step 4: Change The Time
Now you can change the time. Here’s how:
- Select the time zone. Choose the one where you live.
- Set the correct date. Click on the date field.
- Adjust the time. Use the hour and minute settings.
- Check if it is AM or PM.
Step 5: Save Your Changes
After changing the time, save your changes. Look for a “Save” or “Apply” button. Click it to make sure your settings are saved.
Step 6: Restart The Camera
Sometimes, you need to restart your camera. This helps to apply the changes. Turn off the camera and turn it back on.

Troubleshooting Tips
Sometimes things do not go as planned. Here are some tips to help you:
Camera Does Not Show New Time
If your camera does not show the new time, try these:
- Check if you saved the changes.
- Restart the camera again.
- Make sure you selected the right time zone.
Time Keeps Changing
If the time keeps changing, do this:
- Check if the camera has a battery. Replace it if needed.
- Make sure the camera is connected to the internet.
- Look at your router settings. Ensure the time zone is correct.
Using Lorex App for Time Change
You can also use the Lorex app. This is easy and fast. Here’s how:
Step 1: Open The Lorex App
Download the Lorex app from the app store. Open the app and log in.
Step 2: Access Camera Settings
Select the camera you want to change. Look for “Settings” on the app.
Step 3: Change Date And Time
Find the date and time settings. Change the time and date as needed. Save your changes before you exit.
Frequently Asked Questions
How Do I Change The Time On My Lorex Camera?
To change the time, access the camera settings through the Lorex app or web interface. Look for the time settings and adjust accordingly.
Why Is My Lorex Camera Showing The Wrong Time?
The wrong time may be due to incorrect settings or a power outage. Check your time zone and settings.
Can I Set The Time Zone On My Lorex Camera?
Yes, you can set the time zone. Go to the time settings and select your correct time zone.
How Do I Reset The Time On My Lorex Camera?
Resetting the time involves accessing settings and adjusting the date and time manually.
Conclusion
Changing the time on your Lorex camera is easy. Just follow the steps above. Remember to save your changes. If you face any issues, use the troubleshooting tips. Now your camera will show the correct time. This helps you keep track of important moments. You can enjoy peace of mind knowing your recordings are accurate.
If you have any questions or need help, feel free to ask. Keeping your devices updated is always a good idea. Happy monitoring!