Installing a Lorex camera system can seem hard. But it is not. With some simple steps, you can do it. This guide will help you. You will learn how to set up your camera system easily. Let’s get started!
What You Need
Before you start, gather all the tools and items you need.
- Lorex camera system kit
- Drill and drill bits
- Screwdriver
- Coaxial cables or Ethernet cables
- Power cables
- Monitor or TV
- Router (if using Wi-Fi)
- Computer or mobile device for setup
- Mounting brackets (if included)
- Level tool (optional)
Step 1: Choose the Right Place
Pick a good spot for your cameras. Think about these points:
- What do you want to see? Doors, windows, or driveways?
- Place cameras high enough to avoid tampering.
- Check for power outlets nearby.
- Make sure the camera has a clear view.
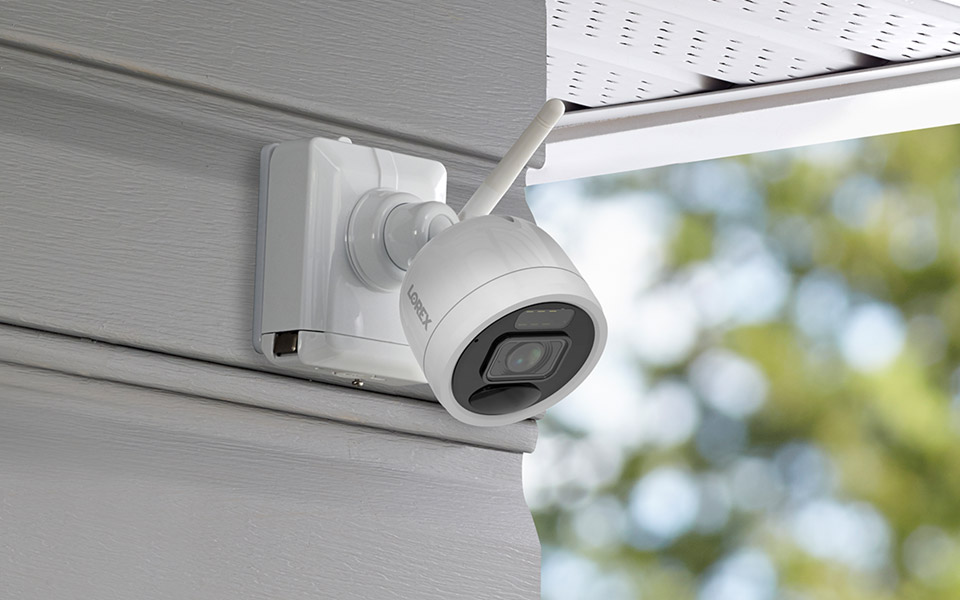
Step 2: Mount the Cameras
Now it is time to mount the cameras. Follow these steps:
- Use the mounting bracket. Hold it against the wall.
- Use a level tool to keep it straight.
- Mark the screw holes with a pencil.
- Drill holes where you marked.
- Attach the bracket using screws.
- Finally, attach the camera to the bracket.
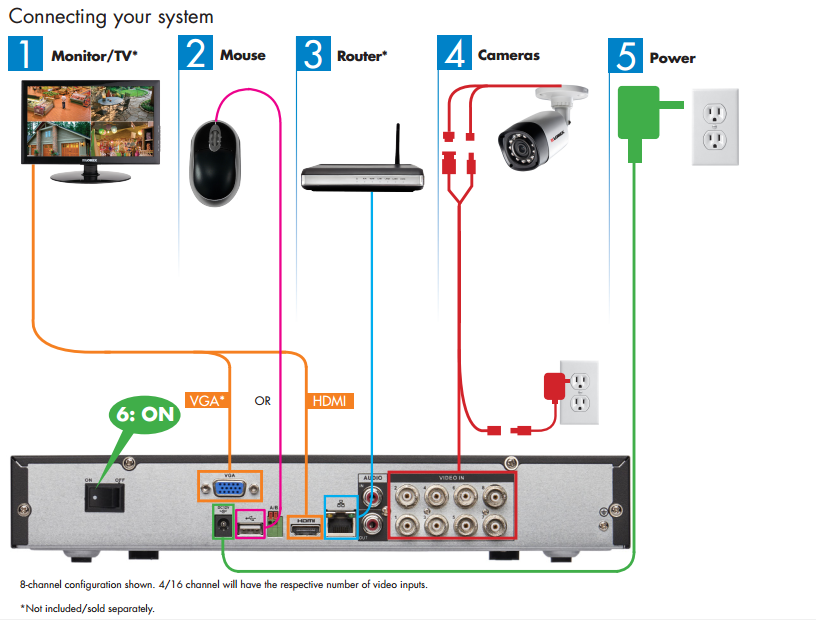
Step 3: Connect the Cables
Connecting the cables is very important. Here is how:
- If you use coaxial cables, connect them to the camera.
- Then, run the cable to the DVR (Digital Video Recorder).
- If you use Ethernet cables, connect them to the camera.
- Next, run the cable to your router or switch.
Step 4: Power Up the Cameras
Your cameras need power. Follow these steps:
- Find the power adapters in your kit.
- Connect the power cables to each camera.
- Plug the other end into a power outlet.
Make sure all cameras are on. You should see a light on each camera.
Step 5: Connect the DVR
Your DVR is the brain of the system. Here’s how to connect it:
- Connect the DVR to your monitor using an HDMI cable.
- Plug the DVR into a power outlet.
- Turn on the DVR and the monitor.
Check if the DVR detects the cameras. This may take a few minutes.
Step 6: Set Up the System
Now, you need to set up the system. Follow these steps:
- Use the DVR remote to navigate.
- Select “Main Menu” on the screen.
- Choose “Camera Settings.”
- Adjust the settings for each camera.
- Set the date and time correctly.
Step 7: Test the Cameras
Testing is very important. Make sure everything works:
- Check the view from each camera.
- Make sure the images are clear.
- Check if all cameras record properly.
If something is wrong, check the cables and connections.
Step 8: Set Up Remote Access
You can view your cameras from anywhere. To do this:
- Download the Lorex app on your phone or tablet.
- Follow the app instructions to connect to your DVR.
- Log in with your account information.
Now you can see your cameras on your mobile device.
Step 9: Regular Maintenance
Keep your system working well. Here are some tips:
- Check the camera lenses for dirt.
- Make sure cables are secure and not damaged.
- Update the firmware as needed.
- Test the cameras every few months.
Troubleshooting Tips
If something goes wrong, try these steps:
- Check if the cameras are powered on.
- Make sure all cables are connected properly.
- Restart the DVR if it does not work.
- Check the settings in the DVR menu.
Frequently Asked Questions
How Do I Set Up A Lorex Camera System?
Start by connecting the DVR to your monitor. Then connect the cameras to the DVR using the provided cables.
What Tools Do I Need For Installation?
You need a drill, screwdriver, and possibly a ladder for high placements. Ensure you also have the camera cables.
Can I Install A Lorex Camera System Myself?
Yes, many users install it themselves. The process is straightforward with clear instructions provided.
How Do I Connect The Cameras To Wi-fi?
Access the camera settings through the app. Follow the prompts to connect to your Wi-Fi network.
Conclusion
Installing a Lorex camera system is not hard. Follow the steps in this guide. You will set it up in no time. Enjoy the peace of mind that comes with having security cameras. Now you can monitor your home easily.