Connecting a Lorex camera is simple. It helps you keep your home safe. In this guide, we will show you how to connect your Lorex camera step by step. Follow these easy instructions and you will be ready in no time.
What is a Lorex Camera?
A Lorex camera is a security camera. It helps you watch your home or business. It can record video. You can see live feeds on your phone or computer. Many people use Lorex cameras for safety.
What You Need
- Lorex camera
- Power adapter
- Coaxial cable (for wired cameras)
- Wi-Fi connection (for wireless cameras)
- Smartphone or computer
- Lorex app (for mobile setup)
Step-by-Step Guide to Connect Lorex Camera
Step 1: Choose The Right Location
First, find a good spot for the camera. Look for a place where it can see a large area. Make sure the camera is high enough. This helps prevent tampering. Avoid placing it in direct sunlight. It can affect the camera’s view.
Step 2: Prepare The Camera
Next, take the camera out of the box. Check if all parts are included. You should have the camera, power adapter, and cables. If something is missing, contact the store.
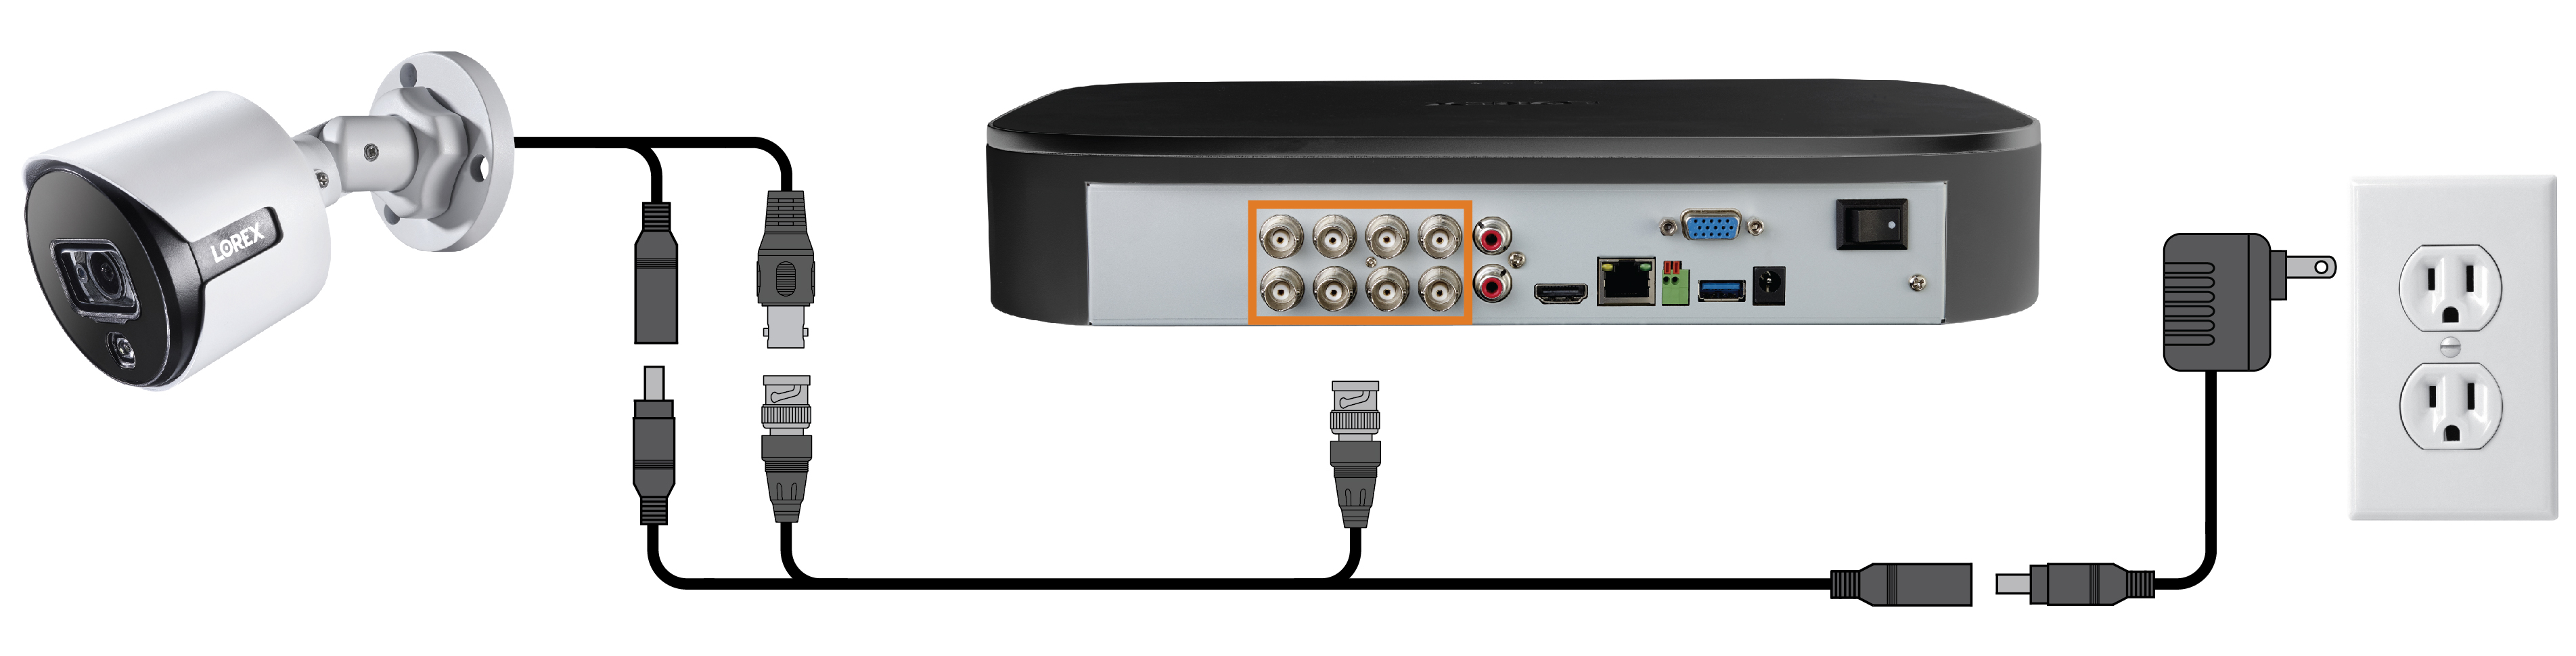
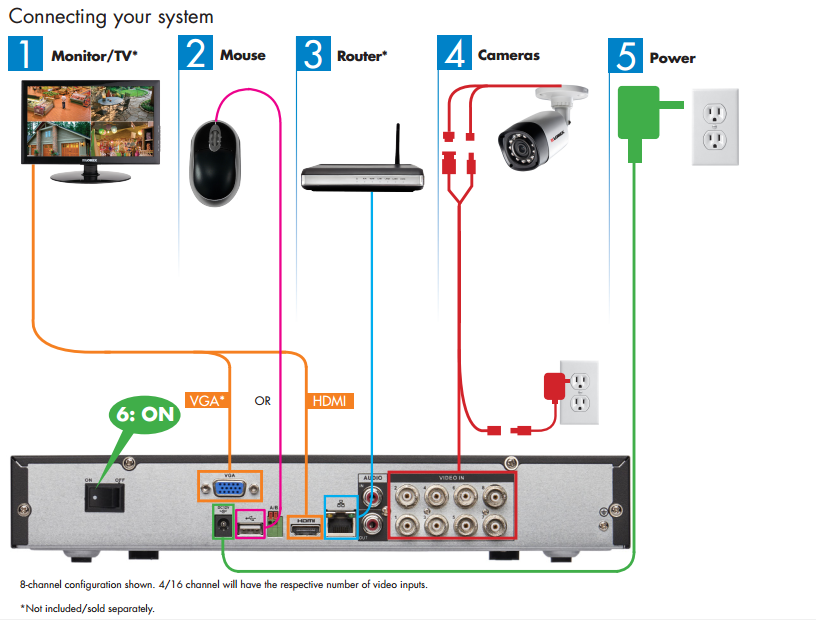
Step 3: Connect The Power Source
Now, connect the power adapter to the camera. Plug it into a wall outlet. If your camera is wired, connect the coaxial cable. This cable goes to your DVR or monitor. For wireless cameras, you only need the power adapter.
Step 4: Connect To The Internet (for Wireless Cameras)
If you have a wireless camera, you need to connect it to Wi-Fi. Open the Lorex app on your smartphone. Create an account or log in. Follow the instructions to add your camera. You will need your Wi-Fi password.
Step 5: Add The Camera In The App
Once you are in the app, tap “Add Device.” Scan the QR code on your camera. This code helps the app find your camera. If the QR code doesn’t work, you can add it manually. Enter the camera’s serial number and follow the prompts.
Step 6: Adjust Camera Settings
After adding the camera, adjust the settings. You can change the name of the camera. Set up motion detection alerts. Choose how often the camera records. Make sure to save your settings.
Step 7: Test The Camera
Now it’s time to test the camera. Go to the live view section of the app. Check if you can see the camera feed. Walk around the area the camera covers. Make sure it captures everything. If it does not work, check your connections.
Troubleshooting Common Issues
Sometimes cameras may not connect easily. Here are some common problems and solutions:
- Camera not found: Ensure the camera is powered on. Check your Wi-Fi connection.
- Poor video quality: Make sure the camera is not too far from the router. Adjust the camera angle.
- App not working: Restart your smartphone. Reinstall the Lorex app if needed.
Understanding Lorex Camera Features
Each Lorex camera has unique features. Here are some common features:
- Night Vision: This feature helps see in the dark.
- Motion Detection: The camera alerts you when it sees movement.
- Two-Way Audio: You can talk through the camera.
Maintaining Your Lorex Camera
Keep your camera in good condition. Here are some tips:
- Regularly clean the camera lens.
- Check the power connections often.
- Update the camera firmware when needed.
Frequently Asked Questions
How Do I Connect My Lorex Camera To Wi-fi?
Connect your Lorex camera to Wi-Fi through the app. Follow the setup instructions in the app for easy connection.
What Devices Can I Use With Lorex Cameras?
Lorex cameras work with smartphones, tablets, and computers. Make sure your device has the Lorex app installed.
Can I Connect Multiple Lorex Cameras?
Yes, you can connect multiple Lorex cameras. Use the app to add each camera easily.
What Should I Do If My Lorex Camera Won’t Connect?
Check your Wi-Fi signal and ensure the camera is powered on. Restart the camera and try again.
Conclusion
Connecting a Lorex camera is easy. By following these steps, you can set it up quickly. Remember to choose the right location. Make sure your camera is connected to power and the internet. Test the camera to ensure it works well.
With your Lorex camera set up, you can watch your home anytime. Enjoy the peace of mind that comes with security. Thank you for reading this guide!