Adding a Lorex IP camera to a Hikvision NVR can seem tricky. But it is not hard when you follow the right steps. This guide will help you do it. You will learn how to set up your camera. This way, you can keep your home or business safe.
What You Need
Before you start, gather the following items:
- Lorex IP camera
- Hikvision NVR
- Ethernet cables
- Power adapter for the camera
- Computer or smartphone
Understanding the Basics
It helps to know a few things about IP cameras and NVRs.
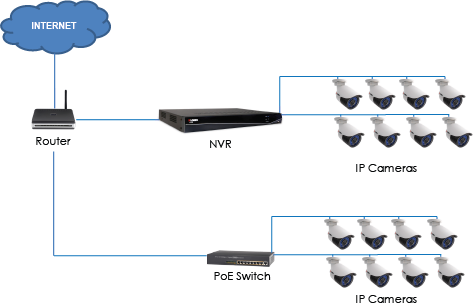
An IP camera sends video over the internet. An NVR records this video. Both devices need to be on the same network.
Your Lorex camera may not work with Hikvision NVR by default. You might need to change some settings. But do not worry, we will guide you through it.
Step 1: Connect Your Devices
First, connect your Lorex camera to your network. Here is how:
- Take the Ethernet cable. Plug one end into the camera.
- Plug the other end into your router or switch.
- Next, connect the camera to a power source.
Now, connect your Hikvision NVR to the same network. Use another Ethernet cable. Connect it to your router or switch, too.
Step 2: Find the Camera’s IP Address
Next, you need to find the IP address of your Lorex camera.
You can do this using the following methods:
- Use the Lorex software that came with your camera.
- Check your router’s connected devices list.
- Use a network scanning tool.
Once you find the IP address, write it down. You will need it soon.
Step 3: Log into Your Hikvision NVR
Now it is time to log into your NVR.
- Open a web browser on your computer or smartphone.
- Type in the NVR’s IP address and press Enter.
- Log in with your username and password.
If you have not changed it, the default username is usually “admin.” The password might be “12345” or blank.
Step 4: Add the Lorex Camera to the NVR
Once you are in the NVR, follow these steps to add your Lorex camera:
- Look for the “Camera” or “Device” section in the menu.
- Select “Add Camera” or “Add Device.”
- Enter the IP address of your Lorex camera.
- Enter the username and password for the camera.
- Click “Add” or “Save.”
If everything is correct, your camera should appear in the list. This means it is now connected!
Step 5: Configure Camera Settings
After adding the camera, you may want to change some settings. Here is what you can do:
- Change the camera name for easy identification.
- Adjust the recording schedule.
- Set up motion detection alerts.
These settings help you use the camera better. Adjust them to fit your needs.

Step 6: Test the Camera
Now, it is time to test your Lorex camera.
Go back to the NVR interface. Click on the live view option. You should see the camera feed. If you do not see anything, check your connections again.
Make sure your camera has power and is connected to the network.

Troubleshooting Tips
Sometimes, things do not work as planned. Here are some tips to help you:
- Check all connections. Ensure cables are plugged in.
- Restart both the camera and the NVR.
- Verify the IP address of the camera.
- Ensure the camera is on the same network as the NVR.
If you still have problems, consult the user manuals. They can provide additional help.
Frequently Asked Questions
How Do I Connect A Lorex Ip Camera To Hikvision Nvr?
You need to access the NVR settings and add the camera’s IP address manually.
What Is The Default Ip Address For Lorex Cameras?
The default IP address is usually 192. 168. 1. 108, but check your camera’s manual.
Can I Use Lorex Cameras With Any Nvr?
Not all NVRs support Lorex cameras. Check compatibility first.
What Settings Are Needed For Adding A Lorex Camera?
You need the camera’s IP address, username, and password to add it.
Conclusion
Adding a Lorex IP camera to a Hikvision NVR is not too hard. By following these steps, you can set up your camera in no time. Remember to check your connections and settings.
With your camera in place, you can now monitor your space. Whether it is your home or business, security is very important. Having a camera helps you feel safer.
Take your time during the setup. Do not rush. If you follow the steps, you will succeed.
Frequently Asked Questions
1. Can I Use Any Ip Camera With A Hikvision Nvr?
No, not all IP cameras work with Hikvision NVR. Check compatibility first.
2. What If My Camera Does Not Connect?
Make sure the camera and NVR are on the same network. Check settings again.
3. Can I View My Cameras Remotely?
Yes, you can view cameras remotely. Set up remote access in your NVR settings.
4. Do I Need Special Software?
Usually, no special software is needed. Use the NVR interface to manage cameras.
5. How Do I Reset My Lorex Camera?
Check the manual for specific reset instructions. Most have a reset button.